Introduction
Low Calorie Greek Yogurt Cake is a light, moist, and protein-rich dessert designed for those who want to enjoy cake while keeping calories relatively low and nutrition more balanced. Unlike traditional butter-based cakes that rely heavily on fat for moisture and richness, this cake uses Greek yogurt as the main ingredient to create a soft, tender crumb with a slightly tangy flavor.
The Greek yogurt not only reduces the need for large amounts of oil or butter but also adds protein, creaminess, and a subtle cheesecake-like texture. The result is a cake that feels indulgent but is significantly lighter than classic sponge or butter cakes. It is ideal for breakfast, healthy snacking, post-workout treats, or guilt-conscious dessert lovers.
This recipe is designed to be very detailed so that even beginners can achieve a soft, fluffy, bakery-style yogurt cake with consistent results.
Yield
8 to 10 slices
Preparation Time
20 minutes
Baking Time
35 to 45 minutes
Cooling Time
60 minutes
Total Time
Approximately 2 hours
Ingredients
For the Cake Batter
1¾ cups all-purpose flour or whole wheat flour for a healthier version
1 cup plain Greek yogurt (low-fat or non-fat preferred)
2 large eggs
½ cup granulated sugar or sugar substitute (adjust based on sweetness preference)
¼ cup vegetable oil or light olive oil
1 teaspoon vanilla extract
1½ teaspoons baking powder
½ teaspoon baking soda
¼ teaspoon salt
1 to 2 tablespoons milk (only if needed for consistency)
Optional Flavor Enhancers
1 teaspoon lemon zest for freshness
1 teaspoon lemon juice for brightness
½ teaspoon cinnamon for warmth
¼ cup blueberries or chopped strawberries for fruit variation
Optional Topping
Light dusting of powdered sugar
Fresh fruit slices
A spoon of extra Greek yogurt on serving
Honey drizzle (optional, but adds calories)
Equipment Needed
Mixing bowls (large and medium)
Whisk or electric hand mixer
Spatula
Measuring cups and spoons
8-inch round cake pan or loaf pan
Parchment paper
Oven
Cooling rack
Choosing the Right Greek Yogurt
Greek yogurt is the foundation of this recipe, so its quality matters. Thick, strained Greek yogurt works best because it provides structure and moisture without making the batter too runny. Low-fat versions reduce calories, while full-fat versions create a richer texture.
Avoid flavored yogurts because they often contain added sugar and artificial flavors that can affect the balance of the cake.
Step 1: Preparing the Baking Pan
Preheat your oven to 175°C (350°F).
Grease an 8-inch cake pan lightly with oil or cooking spray.
Line the bottom with parchment paper to prevent sticking and ensure easy removal after baking.
If using a loaf pan, ensure it is similarly lined for best results.
Step 2: Mixing the Wet Ingredients
In a large mixing bowl, add Greek yogurt and sugar.
Whisk until the mixture becomes smooth and slightly creamy.
Add eggs one at a time, mixing well after each addition to ensure proper emulsification.
Pour in vegetable oil and vanilla extract.
Mix again until the batter is uniform and slightly glossy.
If using lemon zest or cinnamon, add them at this stage so the flavors infuse evenly.
The mixture should appear thick but smooth with no lumps.
Step 3: Preparing the Dry Ingredients
In a separate bowl, combine:
Flour
Baking powder
Baking soda
Salt
Whisk the dry ingredients together to ensure even distribution of leavening agents.
This step is important because uneven mixing can cause the cake to rise irregularly.
Step 4: Combining Wet and Dry Mixtures
Gradually add the dry ingredients into the wet mixture in batches.
Fold gently using a spatula or mix on low speed if using a mixer.
Do not overmix because overworking the batter can make the cake dense instead of fluffy.
The batter should be thick but pourable, similar to a soft muffin batter.
If the mixture feels too thick, add 1 to 2 tablespoons of milk to adjust consistency slightly.
Step 5: Adding Optional Fruits or Fillings
If using blueberries, strawberries, or other fruits, gently fold them into the batter.
Coating fruits lightly in flour before adding helps prevent them from sinking to the bottom during baking.
Avoid overloading the batter with fruit, as too much moisture can affect structure.
Step 6: Pouring the Batter
Pour the batter into the prepared cake pan.
Tap the pan gently on the counter to release air bubbles and ensure even distribution.
Smooth the top using a spatula for an even surface.
Step 7: Baking Process
Place the pan in the center of the preheated oven.
Bake at 175°C (350°F) for 35 to 45 minutes.
Baking time may vary depending on oven type and pan material.
The cake is done when:
The top is lightly golden
The surface springs back when gently pressed
A toothpick inserted in the center comes out clean or with a few moist crumbs
Avoid opening the oven door too early, as this can cause the cake to collapse.
Step 8: Cooling the Cake
Remove the cake from the oven and allow it to cool in the pan for 10 to 15 minutes.
Then carefully transfer it to a wire rack.
Allow it to cool completely for at least 1 hour before slicing.
This resting time helps the structure set and improves texture.
Step 9: Optional Light Topping
For a healthier finish, you can:
Dust lightly with powdered sugar
Spread a thin layer of Greek yogurt on top
Add fresh berries for natural sweetness
Drizzle a small amount of honey if not strictly low-calorie
Keep toppings minimal to maintain the low-calorie profile.
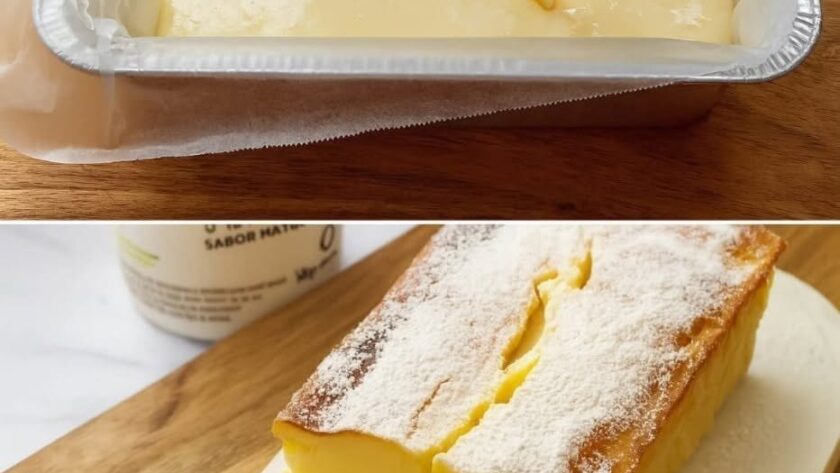
Texture and Flavor Profile
This cake has a soft, moist crumb with a slightly dense but tender structure due to the yogurt content. It is less airy than a traditional sponge cake but more creamy and rich in mouthfeel. The flavor is mildly tangy with subtle sweetness, making it feel lighter and less overpowering than butter-heavy cakes.
If lemon zest is added, it creates a refreshing, cheesecake-like flavor. If cinnamon is included, it gives a warm, comforting aroma.
Serving Suggestions
Serve slices plain with tea or coffee for a light snack.
Pair with fresh fruit for a balanced breakfast.
Serve chilled for a more cheesecake-like texture.
Add a spoon of Greek yogurt on the side for extra protein.
For a dessert version, pair with a small drizzle of chocolate sauce, though this increases calories.
Storage Instructions
Store the cake in an airtight container at room temperature for up to 1 day.
For longer storage, refrigerate for up to 5 days.
Because of the yogurt content, refrigeration is recommended in warm climates.
Before serving refrigerated cake, allow it to sit at room temperature for 10 to 15 minutes to soften.
Freezing Instructions
Wrap individual slices in plastic wrap.
Place in a freezer-safe container.
Freeze for up to 2 months.
Thaw overnight in the refrigerator or at room temperature for a few hours before serving.
Tips for Best Results
Use thick Greek yogurt for better structure.
Do not overmix the batter to keep the cake soft.
Measure flour correctly by spooning and leveling instead of scooping.
Do not skip baking powder and baking soda because they help the cake rise.
Allow full cooling before slicing to avoid crumbling.
Add lemon zest for a fresher flavor profile.
Use a light hand with sweeteners to keep calories low but taste balanced.
Nutritional Overview (Approximate Per Slice)
Calories: 120 to 170 depending on ingredients
Protein: 5 to 8 grams
Carbohydrates: 15 to 22 grams
Fat: 3 to 6 grams
Sugar: varies based on sweetener used
Fiber: 1 to 2 grams
This Low Calorie Greek Yogurt Cake delivers a soft, moist, and lightly tangy dessert experience while keeping calories significantly lower than traditional cakes. It is simple, flexible, and ideal for everyday healthy baking without sacrificing flavor or satisfaction.