Recipe Introduction
Blooming Onion is a famous restaurant-style appetizer made from a large sweet onion that is carefully cut to resemble a flower, coated in a seasoned batter, and fried until golden brown and crispy. As the onion cooks, the petals spread outward, creating the appearance of a blooming flower. The exterior becomes wonderfully crunchy while the inside remains tender, juicy, and sweet. This dish is often served with a creamy, spicy dipping sauce that complements the savory flavor of the onion. Preparing a Blooming Onion at home requires patience and attention to detail, but the results are incredibly rewarding. This detailed recipe explains every step thoroughly, from selecting the perfect onion to achieving a beautifully crisp and flavorful final product.
Preparation Time: 40 minutes
Cooking Time: 15 to 20 minutes
Resting Time: 15 minutes
Total Time: Approximately 1 hour 15 minutes
Servings: 4 to 6
Ingredients for the Blooming Onion
1 very large sweet onion, approximately 14 to 16 ounces
3 cups all-purpose flour
2 tablespoons cornstarch
2 teaspoons paprika
2 teaspoons garlic powder
2 teaspoons onion powder
1 teaspoon cayenne pepper
1 teaspoon black pepper
1 tablespoon salt
1 teaspoon dried oregano
1 teaspoon dried thyme
1 teaspoon baking powder
3 large eggs
1½ cups whole milk
1 tablespoon hot sauce
Vegetable oil for frying
Ingredients for the Dipping Sauce
1 cup mayonnaise
2 tablespoons ketchup
1 tablespoon prepared horseradish
1 teaspoon paprika
½ teaspoon garlic powder
½ teaspoon onion powder
¼ teaspoon cayenne pepper
½ teaspoon black pepper
½ teaspoon salt
1 teaspoon lemon juice
Selecting the Onion
The quality of the onion plays a major role in the success of this recipe. Choose a large sweet onion such as a sweet yellow onion or a sweet onion variety. The onion should feel firm, heavy, and free from bruises or soft spots.
Large onions create more petals and produce a more impressive presentation. Ideally, select an onion with a wide diameter and a relatively symmetrical shape.
Preparing the Onion
Place the onion on a cutting board with the stem end facing upward.
Using a sharp knife, cut approximately half an inch from the pointed stem end while leaving the root end intact. The root acts as a natural anchor that keeps the onion together during cutting and frying.
Remove the outer skin and any dry layers.
Place the onion root-side down on the cutting board.
Using a sharp knife, make a downward cut from the top toward the root, stopping approximately half an inch before reaching the root.
Repeat this process to create four equal sections.
Cut each quarter again to create eight sections.
Continue cutting between each section until you have approximately sixteen evenly spaced petals.
Take your time with this process. Cutting too deeply may cause the onion to separate completely.
Once all cuts have been made, gently turn the onion over and carefully spread the petals apart using your fingers.
The onion should begin to resemble a flower.
Place the onion into a large bowl of ice water.
Allow it to soak for at least 30 minutes.
This soaking process encourages the petals to open further and creates a more dramatic bloom.
Preparing the Dry Coating
In a large mixing bowl, combine the flour, cornstarch, paprika, garlic powder, onion powder, cayenne pepper, black pepper, salt, oregano, thyme, and baking powder.
Whisk thoroughly until all ingredients are evenly distributed.
The flour creates the primary coating.
The cornstarch contributes additional crispness.
The spices provide flavor throughout every petal.
Preparing the Wet Batter
In another large bowl, combine the eggs, milk, and hot sauce.
Whisk until completely smooth.
The eggs help the coating adhere to the onion.
The milk provides moisture and contributes to a light batter texture.
The hot sauce adds subtle depth without overwhelming heat.
Coating the Onion
Remove the onion from the ice water and dry thoroughly using paper towels.
Moisture can interfere with proper coating adhesion.
Place the onion into the bowl containing the seasoned flour mixture.
Using your hands or a spoon, carefully distribute the flour mixture throughout every petal.
Separate the petals gently and ensure flour reaches deep into the onion.
This step is critical because uncovered areas may not develop proper crispness.
Shake off excess flour.
Next, carefully lower the onion into the wet batter.
Use a spoon to help distribute the batter throughout the petals.
Lift the onion and allow excess batter to drip away.
Return the onion to the flour mixture for a second coating.
Once again, work flour between all petals.
The double-coating process creates a thicker, crunchier crust.
Place the coated onion on a wire rack.
Allow it to rest for approximately 15 minutes.
This resting period helps the coating adhere firmly.
Preparing the Frying Oil
Choose a large, deep pot or heavy Dutch oven.
Fill with enough vegetable oil to fully submerge the onion.
Generally, 3 to 4 inches of oil is sufficient.
Heat the oil to 375°F (190°C).
Use a thermometer for accuracy.
Maintaining proper oil temperature is essential for achieving a crispy exterior without excessive oil absorption.
Frying the Blooming Onion
Carefully lower the onion into the hot oil root-side up.
Use a slotted spoon or frying basket if available.
Fry for approximately 8 to 10 minutes.
During cooking, the coating will become golden brown and crisp.
The onion petals will continue opening as they cook.
After the first several minutes, carefully turn the onion if necessary to ensure even browning.
Continue frying until the entire onion reaches a deep golden color.
Avoid overcrowding the fryer or adding additional items during cooking.
Proper oil circulation is important for consistent results.
Removing and Draining
Carefully remove the onion from the oil using a large slotted spoon or fryer basket.
Allow excess oil to drain.
Place the onion on a wire rack positioned over a baking sheet.
Avoid placing directly on paper towels because trapped steam can soften the crispy coating.
Allow the onion to rest for several minutes.
Preparing the Dipping Sauce
While the onion rests, prepare the dipping sauce.
In a medium bowl, combine mayonnaise, ketchup, horseradish, paprika, garlic powder, onion powder, cayenne pepper, black pepper, salt, and lemon juice.
Whisk until completely smooth.
Taste and adjust seasoning if desired.
Refrigerate until ready to serve.
The sauce develops improved flavor after sitting for several minutes.
Serving the Blooming Onion
Place the blooming onion on a large serving platter.
Position a small bowl of dipping sauce in the center or alongside the onion.
Serve immediately while hot and crispy.
Guests can pull apart individual petals and dip them into the sauce.
Flavor and Texture Profile
A properly prepared Blooming Onion offers multiple layers of flavor and texture.
The outer coating is crisp, crunchy, and highly seasoned.
The onion inside becomes sweet, tender, and juicy.
The contrast between the crunchy exterior and soft onion interior creates an exceptionally satisfying eating experience.
The dipping sauce adds creaminess, tanginess, and a slight kick of heat.
Advanced Technique for Extra Crispiness
For an even crunchier result, refrigerate the coated onion for 30 minutes before frying.
The chilled coating adheres better and develops additional texture during frying.
Some cooks also add a small amount of rice flour or additional cornstarch to increase crispness.
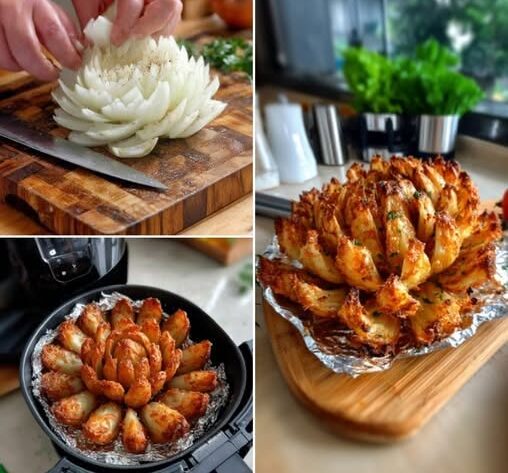
Air Fryer Blooming Onion Variation
If you prefer an air-fried version, spray the coated onion generously with cooking spray.
Place in a preheated air fryer at 375°F (190°C).
Cook for approximately 20 to 25 minutes.
Spray additional oil as needed during cooking.
While slightly different from deep-fried versions, the result remains flavorful and crispy.
Spicy Blooming Onion Variation
Increase the cayenne pepper.
Add chili powder and crushed red pepper flakes to the coating.
Mix extra hot sauce into the dipping sauce.
This variation delivers significantly more heat.
Cheesy Blooming Onion Variation
Immediately after frying, sprinkle finely grated Parmesan cheese over the hot onion.
The residual heat melts the cheese slightly and adds richness.
Professional Tips for Success
Always keep the root intact while cutting.
Use a very sharp knife for precise cuts.
Soak the onion in ice water to encourage blooming.
Coat thoroughly between every petal.
Allow the coating to rest before frying.
Maintain consistent oil temperature throughout cooking.
Drain on a wire rack rather than paper towels.
Serve immediately for maximum crispness.
Common Mistakes to Avoid
Cutting through the root may cause the onion to fall apart.
Insufficient coating results in uneven texture.
Oil that is too cool causes excessive oil absorption.
Oil that is too hot can burn the coating before the onion cooks properly.
Skipping the ice-water soak reduces blooming.
Overcrowding the fryer lowers oil temperature.
Storage Instructions
Blooming Onion is best enjoyed immediately after preparation.
However, leftovers can be stored in an airtight container in the refrigerator for up to two days.
The coating may soften during storage.
Reheating Instructions
Preheat an oven to 375°F (190°C).
Place the onion on a wire rack over a baking sheet.
Heat for approximately 10 to 15 minutes until warmed and crisp.
An air fryer may also be used to restore crispness.
Avoid microwaving because it softens the coating significantly.
Serving Suggestions
Blooming Onion pairs well with grilled steak, burgers, barbecue dishes, sandwiches, fried chicken, roasted meats, and party platters. It can serve as a shared appetizer, game-day snack, or centerpiece for gatherings and celebrations.
Final Result
When prepared correctly, Blooming Onion is an impressive appetizer featuring a beautifully flower-shaped onion with crisp golden petals, tender sweet onion layers, bold seasoning, and a creamy dipping sauce. Every bite combines crunch, sweetness, savory spices, and rich flavor, creating a restaurant-quality dish that is both visually striking and incredibly delicious. The combination of careful preparation, proper coating, and precise frying results in a memorable appetizer that is perfect for entertaining guests or enjoying as a special homemade treat.