Gluten-Free Bread
Gluten-free bread is a wonderful alternative for individuals who cannot consume gluten due to celiac disease, gluten sensitivity, wheat allergy, or personal dietary preferences. Unlike traditional wheat bread, gluten-free bread relies on a combination of gluten-free flours, starches, binders, and proper hydration to create a loaf that is soft, flavorful, and suitable for sandwiches, toast, and everyday use.
Making gluten-free bread at home allows complete control over ingredients, freshness, texture, and flavor. While gluten-free baking can seem challenging at first, understanding the role of each ingredient helps produce reliable and delicious results. This recipe is designed to create a soft, tender loaf with a pleasant crumb structure and a golden crust.
Yield
One standard loaf
Approximately 12 to 14 slices
Preparation Time
Preparation time: 25 minutes
Rising time: 45 to 60 minutes
Baking time: 45 to 55 minutes
Cooling time: 2 hours
Total time: Approximately 4 hours
What Makes Gluten-Free Bread Different?
Traditional bread relies on gluten, a protein found in wheat, barley, and rye. Gluten forms an elastic network that traps gas produced by yeast, giving bread its structure and chew.
Without gluten, bread requires alternative ingredients to provide structure and stability. Common solutions include:
Xanthan gum
Psyllium husk
Guar gum
Eggs
Starches
These ingredients help create elasticity, moisture retention, and volume.
Unlike wheat bread dough, gluten-free dough often resembles a thick batter rather than a kneadable dough.
Ingredients
Dry Ingredients
2 cups rice flour (280 grams)
1 cup sorghum flour (120 grams)
1 cup tapioca starch (120 grams)
1/2 cup potato starch (75 grams)
3 tablespoons psyllium husk powder
2 teaspoons xanthan gum
2 teaspoons fine salt
2 tablespoons granulated sugar
2 1/4 teaspoons instant yeast (one standard packet)
Wet Ingredients
2 large eggs, room temperature
2 tablespoons vegetable oil
1 tablespoon apple cider vinegar
2 cups warm water (approximately 110°F or 43°C)
Optional Ingredients for Enhanced Flavor
1 tablespoon honey
1 tablespoon maple syrup
2 tablespoons milk powder
1 tablespoon sunflower seeds
1 tablespoon flax seeds
1 tablespoon sesame seeds
Equipment Needed
Large mixing bowl
Stand mixer or hand mixer
Measuring cups and spoons
Kitchen scale
9 x 5-inch loaf pan
Parchment paper
Plastic wrap or clean kitchen towel
Wire cooling rack
Instant-read thermometer (optional)
Understanding the Ingredients
Rice Flour
Rice flour forms the primary base of many gluten-free breads. It provides structure and a mild flavor.
Sorghum Flour
Sorghum contributes a slightly sweet taste and improves texture. It helps create a more bread-like crumb.
Tapioca Starch
Tapioca starch provides elasticity and chewiness. It helps compensate for the absence of gluten.
Potato Starch
Potato starch improves softness and moisture retention.
Psyllium Husk
Psyllium husk is one of the most important ingredients in gluten-free baking. When mixed with water, it forms a gel that mimics some properties of gluten.
Xanthan Gum
Xanthan gum acts as a binder and helps hold the bread together.
Yeast
Yeast creates carbon dioxide gas during fermentation, helping the bread rise.
Eggs
Eggs contribute structure, moisture, and richness.
Vinegar
Vinegar strengthens the dough structure and improves yeast activity.
Step 1: Prepare the Loaf Pan
Grease a 9 x 5-inch loaf pan.
Line it with parchment paper.
Allow some parchment to extend over the sides for easy removal.
Set aside.
Step 2: Mix the Dry Ingredients
In a large mixing bowl combine:
Rice flour
Sorghum flour
Tapioca starch
Potato starch
Psyllium husk powder
Xanthan gum
Salt
Sugar
Instant yeast
Whisk thoroughly for at least one minute.
This ensures even distribution of all ingredients.
Step 3: Mix the Wet Ingredients
In a separate bowl combine:
Warm water
Eggs
Vegetable oil
Apple cider vinegar
Honey if using
Whisk until fully blended.
The water should feel warm but not hot.
Excessive heat may damage the yeast.
Step 4: Form the Dough
Slowly pour the wet ingredients into the dry ingredients.
Mix using a stand mixer fitted with a paddle attachment.
Continue mixing for approximately 5 minutes.
Initially the mixture may appear loose.
As the psyllium absorbs water, the dough will thicken considerably.
The final consistency should resemble thick cake batter or soft mashed potatoes.
Step 5: Transfer to the Pan
Spoon the dough into the prepared loaf pan.
Use a spatula dipped in water to smooth the surface.
Shape the top into a gentle dome.
If desired, sprinkle seeds on top.
Lightly press the seeds into the dough.
Step 6: Allow the Dough to Rise
Cover the pan loosely with plastic wrap or a clean kitchen towel.
Place in a warm, draft-free location.
Allow the dough to rise until approximately 50 percent larger.
This generally takes 45 to 60 minutes.
Unlike wheat bread, gluten-free dough usually does not double dramatically in size.
Over-proofing can cause collapse during baking.
Step 7: Preheat the Oven
While the dough rises, preheat the oven to 375°F (190°C).
Position the oven rack in the center.
Allow the oven to fully preheat before baking.
Step 8: Bake the Bread
Place the loaf pan in the center of the oven.
Bake for 45 to 55 minutes.
The top should become golden brown.
The loaf should sound hollow when tapped gently.
For greater accuracy, the internal temperature should reach approximately 205°F to 210°F (96°C to 99°C).
Step 9: Remove from the Pan
Carefully remove the bread from the oven.
Allow it to cool in the pan for 10 minutes.
Lift the loaf out using the parchment paper.
Transfer to a wire rack.
Step 10: Cool Completely
This step is essential.
Allow the bread to cool for at least 2 hours before slicing.
Fresh gluten-free bread continues setting internally as it cools.
Cutting too early may result in a gummy texture.
Patience greatly improves the final loaf.
Evaluating the Finished Bread
A properly baked loaf should have:
A golden crust
Soft but stable crumb
Even distribution of air pockets
Pleasant aroma
Moist interior
Slices that hold together without crumbling
Serving Suggestions
Gluten-free bread can be enjoyed in many ways.
Serve toasted with butter.
Use for sandwiches.
Spread with jam or honey.
Serve alongside soups and stews.
Use for French toast.
Prepare grilled cheese sandwiches.
Top with avocado and eggs.
Serve with nut butter.
Use for open-faced sandwiches.
Create garlic bread.
Prepare bread pudding.
Make homemade croutons.
Use for stuffing.
Flavor Variations
Honey Oat Bread
Add:
2 tablespoons honey
1/2 cup certified gluten-free oats
This variation provides a mild sweetness and rustic flavor.
Seeded Bread
Add:
Sunflower seeds
Pumpkin seeds
Sesame seeds
Flax seeds
The seeds add texture and nutrition.
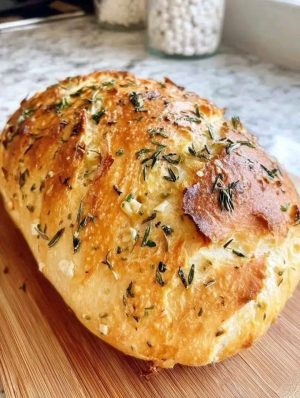
Herb Bread
Add:
1 tablespoon dried rosemary
1 teaspoon thyme
1 teaspoon oregano
Excellent for serving with soups and pasta.
Cinnamon Raisin Bread
Add:
1 teaspoon cinnamon
1/2 cup raisins
2 tablespoons brown sugar
Perfect for breakfast.
Garlic Bread Variation
Add:
1 teaspoon garlic powder
1 teaspoon onion powder
1 tablespoon dried parsley
Ideal for savory meals.
Olive Bread
Add:
1/2 cup chopped olives
1 teaspoon dried oregano
A flavorful Mediterranean-inspired loaf.
Storage Instructions
Room Temperature
Store in an airtight container.
Best consumed within 2 to 3 days.
Refrigerator
Store up to one week.
Warm slices before serving for best texture.
Freezer
Slice before freezing.
Wrap tightly.
Freeze for up to three months.
Remove slices as needed.
Toast directly from frozen.
Troubleshooting
Bread Is Too Dense
Possible causes:
Insufficient hydration
Expired yeast
Under-proofing
Solutions:
Increase water slightly
Check yeast freshness
Allow proper rise time
Bread Collapses
Possible causes:
Over-proofing
Too much liquid
Weak structure
Solutions:
Reduce rise time
Measure ingredients carefully
Use recommended amounts of psyllium and xanthan gum
Bread Is Gummy
Possible causes:
Under-baking
Slicing too soon
Excess moisture
Solutions:
Bake longer
Cool completely before slicing
Verify internal temperature
Bread Is Dry
Possible causes:
Too much flour
Over-baking
Insufficient fat
Solutions:
Measure accurately
Reduce baking time slightly
Increase oil modestly
Nutritional Information
Approximate values per slice
Calories: 140 to 170
Protein: 3 to 5 grams
Fat: 2 to 4 grams
Carbohydrates: 28 to 32 grams
Fiber: 2 to 4 grams
Sugar: 1 to 3 grams
Values vary depending on ingredients used.
Advanced Tips for Exceptional Gluten-Free Bread
Weigh ingredients whenever possible.
Kitchen scales provide more accurate results than measuring cups.
Allow ingredients to reach room temperature.
Use fresh yeast.
Avoid over-proofing.
Keep detailed notes about flour brands.
Different brands absorb moisture differently.
Experiment with flour combinations.
Maintain consistent hydration.
Cool completely before storage.
Toast slices lightly before serving.
Freeze extra bread immediately to preserve freshness.
Conclusion
Homemade gluten-free bread can be every bit as satisfying as traditional bread when prepared with the proper balance of flours, starches, hydration, and binders. This recipe combines rice flour, sorghum flour, tapioca starch, potato starch, psyllium husk, and xanthan gum to create a loaf that is soft, flavorful, and versatile. With careful mixing, proper proofing, thorough baking, and adequate cooling time, the result is a bakery-style gluten-free bread suitable for sandwiches, toast, breakfast dishes, and countless everyday meals. The ability to customize flavors, seeds, herbs, and textures makes this recipe an excellent foundation for developing your own favorite gluten-free bread variations.