Keto Cheesecake is one of the most popular low-carbohydrate desserts for individuals following a ketogenic lifestyle. It delivers the rich, creamy texture and indulgent flavor of traditional cheesecake while significantly reducing sugar and carbohydrate content. By replacing sugar with keto-friendly sweeteners and using almond flour instead of conventional graham cracker crusts, keto cheesecake becomes a dessert that can fit comfortably into many low-carb meal plans.
Unlike many commercial keto desserts that may contain artificial additives or preservatives, homemade keto cheesecake allows complete control over ingredients, sweetness levels, texture, and flavor. The result is a luxurious dessert with a smooth, velvety filling, a buttery nut-based crust, and a taste that rivals traditional bakery-style cheesecakes.
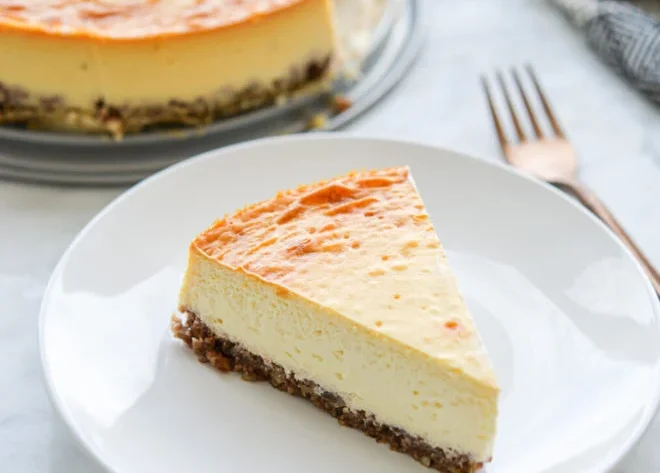
This recipe is designed to produce a rich New York-style keto cheesecake with a creamy center, delicate vanilla flavor, and perfectly balanced sweetness. Whether served plain or topped with fresh berries, whipped cream, or a keto fruit sauce, this cheesecake is suitable for holidays, family gatherings, celebrations, or everyday enjoyment.
Yield
One 9-inch cheesecake
Approximately 12 to 16 slices
Preparation Time
Preparation time: 30 minutes
Baking time: 60 to 75 minutes
Cooling time: 2 hours
Chilling time: 6 to 8 hours or overnight
Total time: Approximately 10 to 12 hours
Why Keto Cheesecake Is Different
Traditional cheesecake contains large amounts of sugar and often uses graham crackers or cookies for the crust. These ingredients contribute significant carbohydrates.
Keto cheesecake substitutes low-carbohydrate ingredients while preserving the texture and flavor people expect from a premium cheesecake.
Common keto substitutions include:
Almond flour instead of graham crackers
Erythritol instead of sugar
Allulose instead of sugar
Monk fruit sweetener
Stevia blends
Full-fat dairy products
These modifications dramatically reduce net carbohydrates while maintaining creaminess and richness.
A properly made keto cheesecake should have:
Smooth texture
Dense but creamy consistency
Rich flavor
Stable slices
Minimal carbohydrates
Ingredients
Crust Ingredients
2 cups almond flour
1/4 cup powdered erythritol
1/4 teaspoon salt
1/2 teaspoon cinnamon (optional)
6 tablespoons unsalted butter, melted
1 teaspoon vanilla extract
Cheesecake Filling Ingredients
32 ounces full-fat cream cheese, softened
1 cup powdered erythritol or allulose
4 large eggs
1 cup sour cream
1/2 cup heavy whipping cream
2 teaspoons vanilla extract
1 tablespoon fresh lemon juice
1 teaspoon lemon zest
1/4 teaspoon salt
Optional Sour Cream Topping
1 cup full-fat sour cream
2 tablespoons powdered erythritol
1 teaspoon vanilla extract
Optional Berry Sauce
1 cup raspberries
2 tablespoons water
1 tablespoon keto sweetener
1 teaspoon lemon juice
Equipment Needed
9-inch springform pan
Large mixing bowl
Electric mixer or stand mixer
Rubber spatula
Measuring cups and spoons
Roasting pan
Aluminum foil
Cooling rack
Sharp knife
Understanding the Ingredients
Cream Cheese
Cream cheese forms the foundation of cheesecake. Full-fat cream cheese produces the richest texture and flavor. Low-fat alternatives may result in a less creamy dessert.
Almond Flour
Almond flour replaces traditional graham cracker crumbs. It provides a slightly nutty flavor and significantly lowers carbohydrate content.
Erythritol
Erythritol is a sugar alcohol commonly used in keto baking. It contributes sweetness without substantially affecting blood sugar levels.
Allulose
Allulose provides sweetness similar to sugar while offering a smoother texture and less cooling sensation than erythritol.
Eggs
Eggs provide structure and stability. They help the cheesecake maintain its shape after baking.
Sour Cream
Sour cream contributes tanginess and additional creaminess. It also helps create a smoother filling.
Heavy Cream
Heavy cream increases richness and creates a luxurious mouthfeel.
Lemon Juice
A small amount of lemon juice brightens the flavor and balances the richness of the dairy ingredients.
Vanilla Extract
Vanilla enhances the overall flavor profile and complements the cream cheese.
Step 1: Prepare the Pan
Grease a 9-inch springform pan thoroughly.
Line the bottom with parchment paper.
Wrap the outside of the pan with two layers of aluminum foil.
This helps prevent water from entering the pan during the water bath baking process.
Set aside.
Step 2: Preheat the Oven
Preheat the oven to 325°F (163°C).
Position the oven rack in the center.
Allow the oven to fully preheat before baking.
A stable baking temperature helps prevent cracking.
Step 3: Prepare the Crust
In a mixing bowl combine:
Almond flour
Powdered erythritol
Salt
Cinnamon if using
Mix thoroughly.
Add:
Melted butter
Vanilla extract
Stir until the mixture resembles damp sand.
The mixture should hold together when pressed between your fingers.
Step 4: Form the Crust
Transfer the crust mixture into the prepared springform pan.
Press firmly across the bottom.
Press slightly up the sides if desired.
Use the bottom of a measuring cup to create an even layer.
Uniform thickness helps ensure even baking.
Step 5: Pre-Bake the Crust
Bake the crust for approximately 10 to 12 minutes.
The edges should become lightly golden.
Remove from the oven.
Allow the crust to cool while preparing the filling.
Step 6: Prepare the Cream Cheese
Place softened cream cheese into a large bowl.
Beat on low speed until completely smooth.
Scrape down the bowl frequently.
Continue mixing until no lumps remain.
This step is critical for achieving a silky cheesecake texture.
Step 7: Add Sweetener
Gradually add the powdered sweetener.
Continue mixing on low speed.
Beat until fully incorporated.
The mixture should appear smooth and creamy.
Avoid high-speed mixing because excessive air can lead to cracks during baking.
Step 8: Add Eggs
Add eggs one at a time.
Mix after each addition until just combined.
Do not overmix.
Overmixing introduces excess air into the batter.
This can cause the cheesecake to rise excessively and then collapse.
Step 9: Add Remaining Ingredients
Add:
Sour cream
Heavy cream
Vanilla extract
Lemon juice
Lemon zest
Salt
Mix gently until smooth.
Scrape the bowl thoroughly.
Ensure all ingredients are evenly incorporated.
Step 10: Fill the Pan
Pour the cheesecake batter onto the cooled crust.
Smooth the surface with a spatula.
Tap the pan gently on the counter several times.
This helps remove trapped air bubbles.
Step 11: Prepare a Water Bath
Place the springform pan into a larger roasting pan.
Carefully pour hot water into the roasting pan.
The water should reach halfway up the sides of the cheesecake pan.
The water bath serves several important purposes:
Promotes gentle baking
Reduces cracking
Creates a creamy texture
Maintains even heat distribution
Improves moisture retention
Step 12: Bake the Cheesecake
Transfer the roasting pan to the oven.
Bake for approximately 60 to 75 minutes.
The outer edges should appear set.
The center should still jiggle slightly when shaken gently.
Avoid waiting until the center becomes completely firm.
Residual heat will continue cooking the cheesecake after removal from the oven.
Step 13: Slow Cooling
Turn off the oven.
Leave the cheesecake inside.
Prop the oven door open slightly.
Allow the cheesecake to cool gradually for one hour.
Gradual cooling greatly reduces the likelihood of surface cracks.
Step 14: Cool at Room Temperature
Remove the cheesecake from the oven.
Remove the springform pan from the water bath.
Discard the foil.
Place the cheesecake on a cooling rack.
Allow it to cool completely at room temperature.
Step 15: Prepare the Optional Topping
In a bowl combine:
Sour cream
Powdered sweetener
Vanilla extract
Mix until smooth.
Spread evenly across the cooled cheesecake.
This creates a classic bakery-style finish.
Step 16: Chill Thoroughly
Transfer the cheesecake to the refrigerator.
Chill for at least 6 to 8 hours.
Overnight chilling is highly recommended.
During chilling:
The texture firms
Flavors develop
Slices become cleaner
Creaminess improves
Patience produces a superior cheesecake.
Step 17: Prepare the Berry Sauce
Place raspberries, water, sweetener, and lemon juice into a saucepan.
Cook over medium heat.
Stir frequently.
Cook until the berries soften and release their juices.
Continue until slightly thickened.
Allow to cool completely.
Serve alongside individual slices.
Evaluating the Finished Cheesecake
A properly baked keto cheesecake should have:
Smooth surface
Creamy center
Firm edges
Rich aroma
Stable slices
Dense but silky texture
Balanced sweetness
No grainy texture
No excessive cracking
Serving Suggestions
Serve plain for classic flavor.
Top with fresh raspberries.
Serve with strawberries.
Add whipped cream.
Drizzle with berry sauce.
Sprinkle with toasted almonds.
Serve with keto chocolate sauce.
Top with lemon zest.
Pair with coffee.
Serve with espresso.
Enjoy with unsweetened tea.
Serve during holidays.
Use as a birthday dessert.
Offer at dinner parties.
Prepare for special occasions.
Flavor Variations
Chocolate Keto Cheesecake
Add:
1/2 cup unsweetened cocoa powder
2 ounces melted sugar-free chocolate
Creates a rich chocolate version.
Lemon Keto Cheesecake
Add:
2 tablespoons lemon zest
3 tablespoons lemon juice
Produces a bright citrus flavor.
Pumpkin Keto Cheesecake
Add:
1 cup pumpkin puree
1 teaspoon cinnamon
1/2 teaspoon nutmeg
1/2 teaspoon ginger
Perfect for autumn.
Peanut Butter Keto Cheesecake
Add:
3/4 cup natural peanut butter
Creates a rich nutty flavor.
Coffee Cheesecake
Add:
2 tablespoons espresso powder
Provides a deep coffee flavor.
Coconut Cheesecake
Add:
1/2 cup shredded unsweetened coconut
1 teaspoon coconut extract
Produces a tropical variation.
Storage Instructions
Refrigerator
Store covered in the refrigerator.
Best consumed within 5 days.
Keep away from strong-smelling foods.
Freezer
Wrap individual slices tightly.
Store in freezer-safe containers.
Freeze for up to 3 months.
Thaw overnight in the refrigerator before serving.
Troubleshooting
Cheesecake Cracks
Possible causes:
Overbaking
Rapid cooling
Excess air in batter
Solutions:
Use a water bath
Mix gently
Cool gradually
Remove when center still jiggles
Cheesecake Is Grainy
Possible causes:
Cold cream cheese
Improper mixing
Solution:
Use room-temperature ingredients
Mix cream cheese thoroughly before adding other ingredients
Cheesecake Is Too Soft
Possible causes:
Insufficient chilling
Underbaking
Solution:
Chill overnight
Verify baking time
Cheesecake Is Too Dense
Possible causes:
Overmixing
Too many eggs
Incorrect measurements
Solution:
Measure carefully
Mix only until ingredients combine
Nutritional Information
Approximate values per slice based on 14 servings
Calories: 380 to 420
Protein: 8 to 10 grams
Fat: 35 to 39 grams
Total Carbohydrates: 7 to 9 grams
Fiber: 2 to 3 grams
Net Carbohydrates: 4 to 6 grams
Sugar: 2 grams
Values vary depending on ingredients and sweeteners used.
Advanced Tips for Exceptional Keto Cheesecake
Use room-temperature ingredients.
Choose full-fat dairy products.
Avoid overmixing the batter.
Bake using a water bath.
Do not rush the cooling process.
Allow overnight chilling whenever possible.
Use powdered sweeteners for smoother texture.
Scrape the mixing bowl frequently.
Tap the filled pan gently to release air bubbles.
Use a hot knife for perfectly clean slices.
Experiment with flavored extracts.
Record ingredient brands for consistent results.
Conclusion
Keto cheesecake demonstrates that a low-carbohydrate lifestyle does not require sacrificing rich desserts or indulgent flavors. By combining cream cheese, sour cream, heavy cream, almond flour, and keto-friendly sweeteners, this recipe produces a luxurious cheesecake with a smooth texture, satisfying richness, and minimal carbohydrates. Proper preparation, gentle mixing, water bath baking, gradual cooling, and thorough chilling all contribute to a professional-quality result. Whether served plain, topped with berries, flavored with chocolate, or customized with seasonal ingredients, keto cheesecake remains one of the most versatile and beloved desserts in ketogenic baking. Its combination of elegance, simplicity, and exceptional flavor makes it a recipe worth mastering for both beginners and experienced home bakers alike.