Introduction
Sourdough Sandwich Bread is a soft, flavorful, naturally leavened bread that combines the complex taste of traditional sourdough with the tender texture and sliceable structure of classic sandwich bread. Unlike rustic artisan sourdough loaves that often have thick crusts and large open holes, sandwich-style sourdough is designed to be soft, uniform, easy to slice, and suitable for everything from toast and grilled cheese sandwiches to deli sandwiches and breakfast recipes.
The long fermentation process develops deep flavor, improves texture, and creates a loaf that remains fresh for several days. The natural fermentation performed by a healthy sourdough starter contributes subtle tanginess while helping the dough rise without commercial yeast.
This detailed recipe covers every aspect of making Sourdough Sandwich Bread, including starter preparation, ingredient selection, dough development, fermentation, shaping, proofing, baking, cooling, slicing, storage, troubleshooting, and numerous variations.
Yield
Makes 2 standard sandwich loaves
Preparation Time: 45 minutes
Fermentation Time: 8 to 14 hours
Proofing Time: 2 to 4 hours
Baking Time: 35 to 45 minutes
Total Time: Approximately 12 to 18 hours
Ingredients
For the Dough
1000 grams bread flour
650 grams warm water
200 grams active sourdough starter
60 grams unsalted butter, softened
20 grams fine sea salt
30 grams honey
20 grams sugar
Optional Ingredients for Extra Softness
50 grams whole milk powder
30 grams olive oil
20 grams additional honey
For Greasing
Butter or neutral oil
For Finishing
Melted butter for brushing after baking
Understanding Sourdough Sandwich Bread
Traditional artisan sourdough often emphasizes an open crumb and thick crust.
Sandwich bread has different goals:
Soft texture
Even crumb
Easy slicing
Square shape
Thin crust
Excellent sandwich performance
This recipe balances the flavor of sourdough with the practicality of sandwich bread.
The result is a loaf that is flavorful yet soft enough for everyday use.
Understanding the Sourdough Starter
A sourdough starter is a living culture of wild yeast and beneficial bacteria.
A healthy starter should:
Double in size after feeding
Have a pleasant aroma
Show visible bubbles
Pass the float test when mature
The starter provides natural leavening and flavor development.
A strong starter is essential for successful bread making.
Feeding the Starter
Several hours before mixing the dough:
Discard a portion of the starter.
Feed with equal weights of flour and water.
Allow it to rise until active and bubbly.
The starter should reach peak activity before use.
This typically occurs 4 to 8 hours after feeding depending on temperature.
Choosing the Flour
Bread flour is highly recommended.
Its higher protein content creates stronger gluten development.
Strong gluten supports better loaf structure and volume.
Some bakers replace a small portion with whole wheat flour for added flavor.
High-quality flour significantly improves final results.
Measuring Ingredients
Using a digital scale is strongly recommended.
Weight measurements provide greater accuracy than volume measurements.
Consistent measurements help ensure reliable results.
Professional bakers almost always work by weight.
Mixing the Dough
In a large mixing bowl combine:
Warm water
Active sourdough starter
Honey
Sugar
Mix until mostly dissolved.
Add bread flour.
Mix until a rough dough forms.
Allow the dough to rest for approximately 30 minutes.
This resting stage is known as autolyse.
Understanding Autolyse
Autolyse allows flour to absorb water.
During this period:
Gluten begins developing naturally.
Dough becomes easier to handle.
Flavor improves.
The dough gains extensibility.
Many experienced bakers consider this step essential.
Adding Salt and Butter
After the autolyse period:
Add salt.
Add softened butter.
Mix thoroughly.
Continue kneading until the dough becomes smooth and elastic.
The butter contributes softness.
The salt strengthens gluten and enhances flavor.
Kneading the Dough
Knead by hand for approximately 10 to 15 minutes.
Alternatively, use a stand mixer for 8 to 10 minutes.
The dough should become:
Smooth
Elastic
Slightly tacky
Strong and stretchy
Perform a windowpane test.
A properly developed dough stretches thin without tearing.
First Fermentation
Place the dough into a lightly oiled container.
Cover securely.
Allow fermentation at room temperature.
The dough should gradually expand.
Fermentation time depends on:
Starter strength
Room temperature
Dough temperature
Typically this stage requires 4 to 8 hours.
The dough should increase noticeably in volume.
Stretch and Fold Method
During the first few hours:
Perform stretch-and-fold sequences every 30 minutes.
To do this:
Lift one side of the dough.
Stretch gently.
Fold toward the center.
Rotate and repeat.
These folds strengthen gluten.
The dough becomes smoother and stronger.
Recognizing Proper Fermentation
Properly fermented dough should:
Appear airy
Contain visible bubbles
Feel elastic
Increase significantly in size
Have a pleasant aroma
Avoid over-fermentation.
Excess fermentation can weaken dough structure.
Dividing the Dough
Transfer the dough to a lightly floured surface.
Divide into two equal portions.
Use a bench scraper if available.
Maintain gentle handling to preserve gas bubbles.
Pre-Shaping
Shape each portion into a loose round.
Allow the dough to rest for approximately 20 minutes.
This resting period relaxes the gluten.
The dough becomes easier to shape.
Final Shaping
Flatten each portion gently.
Form a rectangle.
Roll tightly from one end.
Seal the seam.
Create a smooth log.
The shape should fit comfortably inside the loaf pan.
Proper shaping contributes to an even crumb and attractive appearance.
Preparing the Loaf Pans
Grease two loaf pans thoroughly.
Butter or oil works well.
Ensure corners are coated.
Proper preparation prevents sticking.
Proofing the Loaves
Place shaped dough into prepared pans.
Cover loosely.
Allow proofing until the dough rises above the rim.
This stage may require 2 to 4 hours.
Temperature significantly influences proofing time.
Avoid rushing.
Proper proofing ensures good volume and texture.
The Finger Test
To evaluate readiness:
Press the dough gently with a fingertip.
If the indentation slowly springs back, the loaf is ready.
If it springs back immediately, more proofing is needed.
If it collapses completely, over-proofing may have occurred.
Preheating the Oven
Preheat the oven to 190°C.
Allow sufficient time for complete heating.
A properly preheated oven promotes oven spring and consistent baking.
Baking the Bread
Place the loaf pans on the center rack.
Bake for approximately 35 to 45 minutes.
The tops should become golden brown.
The internal temperature should reach approximately 93°C to 96°C.
The loaves should sound hollow when tapped.
Achieving a Soft Crust
Immediately after baking:
Remove the loaves from the pans.
Brush tops lightly with melted butter.
The butter softens the crust.
This creates the classic sandwich bread texture.
Cooling the Bread
Place loaves on a wire rack.
Allow complete cooling.
This process may require 2 hours.
Avoid slicing while warm.
The crumb continues setting during cooling.
Premature slicing can create a gummy texture.
Understanding Crumb Structure
A proper sandwich loaf should have:
Small uniform holes
Soft texture
Even crumb
Good slicing ability
Moist interior
The crumb should be tender but not dense.
Slicing the Bread
Use a serrated bread knife.
Allow the knife to do the work.
Avoid excessive pressure.
Slice according to desired thickness.
Uniform slices improve presentation and functionality.
Flavor Profile
Sourdough sandwich bread offers:
Mild tanginess
Rich wheat flavor
Subtle sweetness
Soft buttery texture
Balanced aroma
Excellent versatility
The flavor is more complex than commercial sandwich bread.
Toasting Characteristics
This bread toasts beautifully.
The sugars developed during fermentation encourage even browning.
The exterior becomes crisp.
The interior remains tender.
Many people consider sourdough toast superior to standard bread.
Sandwich Applications
This bread is ideal for:
Turkey sandwiches
Ham sandwiches
Chicken sandwiches
Egg sandwiches
Peanut butter sandwiches
Grilled cheese
Club sandwiches
Breakfast sandwiches
Tuna sandwiches
Vegetable sandwiches
The sturdy crumb holds fillings well.
Whole Wheat Variation
Replace 25 to 40 percent of the bread flour with whole wheat flour.
Increase hydration slightly.
The result is:
More fiber
Nutty flavor
Darker crumb
Enhanced nutritional value
Honey Oat Variation
Add:
Rolled oats
Additional honey
Milk
This creates a softer and slightly sweeter loaf.
The oats contribute texture and flavor.
Seeded Sourdough Sandwich Bread
Add:
Sunflower seeds
Sesame seeds
Flax seeds
Pumpkin seeds
The seeds provide crunch and nutrition.
Milk Bread Style Variation
Replace part of the water with milk.
Increase butter slightly.
The loaf becomes:
Softer
Richer
More tender
This version resembles bakery-style sandwich bread.
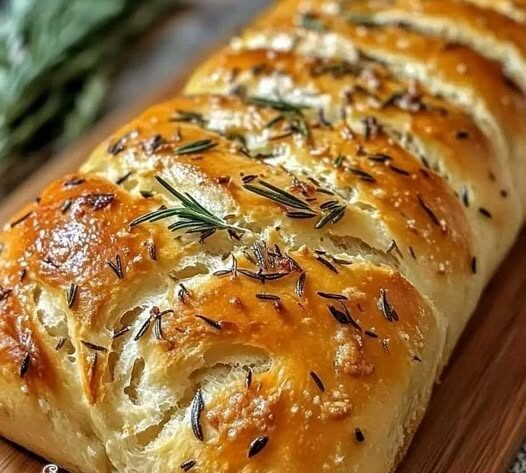
Herb Variation
Add:
Rosemary
Thyme
Parsley
Chives
The herbs create savory complexity.
This variation pairs well with soups and sandwiches.
Cheese Variation
Incorporate:
Cheddar cheese
Parmesan cheese
Gruyère
The cheese enriches flavor and texture.
Cinnamon Raisin Variation
Add:
Ground cinnamon
Raisins
Brown sugar
This variation works well for breakfast and toast.
Garlic Butter Variation
Add roasted garlic to the dough.
Brush with garlic butter after baking.
This creates an aromatic savory loaf.
Nutritional Benefits
Natural sourdough fermentation may:
Improve digestibility
Enhance flavor development
Reduce certain anti-nutrients
Support mineral availability
The bread also provides:
Carbohydrates
Protein
B vitamins
Iron
Magnesium
Storage Instructions
Store completely cooled bread.
Keep in a bread box or airtight container.
Consume within 4 to 5 days for best quality.
Avoid refrigeration when possible.
Refrigeration may accelerate staling.
Freezing Instructions
Slice before freezing.
Wrap tightly.
Store in freezer bags.
Freeze for up to 3 months.
Individual slices can be thawed as needed.
Reheating Instructions
Toast slices directly from frozen.
Warm whole loaves in a low oven.
Refresh crust and aroma through gentle reheating.
Common Mistakes and Solutions
Weak starter may result in poor rise.
Ensure the starter is active before mixing.
Underproofing creates dense bread.
Allow sufficient fermentation.
Overproofing weakens structure.
Monitor dough carefully.
Insufficient kneading limits gluten development.
Develop the dough thoroughly.
Cutting bread too early creates gumminess.
Allow complete cooling.
Using inaccurate measurements may affect consistency.
Use a digital scale whenever possible.
Professional Tips
Maintain consistent temperatures.
Use high-quality bread flour.
Feed the starter regularly.
Allow adequate fermentation.
Develop gluten fully.
Shape tightly.
Proof patiently.
Bake thoroughly.
Cool completely.
Store properly.
Practice regularly.
Every loaf teaches valuable lessons.
Creating Bakery-Style Results
Use fresh ingredients.
Monitor dough temperature.
Maintain strong starter health.
Shape carefully.
Use quality loaf pans.
Bake evenly.
Brush with butter.
Cool on racks.
Slice uniformly.
These techniques contribute to professional-quality bread.
Serving Suggestions
Serve toasted with butter.
Use for sandwiches.
Make French toast.
Prepare grilled cheese.
Serve with soups.
Use for avocado toast.
Create breakfast sandwiches.
Pair with jams and preserves.
Serve alongside salads.
Use for garlic bread.
Make croutons from leftovers.
Create bread pudding.
The versatility is nearly endless.
Why Sourdough Sandwich Bread Is Special
This bread combines:
Natural fermentation
Soft texture
Excellent flavor
Practical slicing
Long freshness
Versatility
Traditional craftsmanship
Modern convenience
The result is a loaf that performs beautifully in everyday meals while offering the depth of flavor associated with artisan baking.
Conclusion
Sourdough Sandwich Bread is a remarkable balance between traditional sourdough craftsmanship and the practicality of everyday sandwich bread. Through careful starter preparation, proper fermentation, strong gluten development, thoughtful shaping, and controlled baking, the dough transforms into a soft, flavorful loaf with a tender crumb and mild tangy character. Whether used for toast, sandwiches, breakfast recipes, grilled cheese, or simply enjoyed with butter, this bread offers exceptional versatility and homemade quality. With practice and attention to detail, bakers can consistently produce bakery-worthy sourdough sandwich loaves that combine nutrition, flavor, texture, and functionality in every slice.